Checking Your Output
Use FreeSurfer's image viewer (Freeview) to inspect the segmented volumes and surface boundaries for errors. Because Freeview is a graphical user interface (GUI) process, you may benefit from requesting an interactive desktop session with VirtualGL. This is not necessary to sucessfuly run and perform quality assurance, but will utilizie 3D accelerated hardware to improve the experience. See more information on running an interactive desktop with VirtualGL here.
Viewing Output in Freeview
You will want to open the brainmask, white-matter mask, and normalized T1w volumes. Additionally, you'll want to overlay the white-matter and pial surfaces onto both hemispheres (assuming you processed a full brain). The command to open all these files in Freeview is long and you may find yourself typing it over and over again. A nice shortcut to avoid this is to make an alias, which is essentially a nickname for a full command. To create this alias, open your ~/.bashrc file and copy the following:
# User specific aliases and functions
alias fcheck="freeview -v \
mri/T1.mgz \
mri/wm.mgz:colormap="heat":opacity=0.5 \
mri/brainmask.mgz \
-f surf/lh.white:edgecolor=blue \
surf/lh.pial:edgecolor=yellow \
surf/rh.white:edgecolor=blue \
surf/rh.pial:edgecolor=yellow"
To use this alias, you need to source your ~/.bashrc, just once:
[scc4]$ source ~/.bashrc
Each time you go to use this alias, make sure you have loaded a FreeSurfer module. Then change into the subject's directory you want to inspect and enter the new alias command (fcheck in this example).
[scc4]$ module load freesurfer/7.3.2
[scc4]$ cd $SUBJECTS_DIR/test_subject
[scc4]$ fcheck
If you do opt to use a VirtualGL session, you need to precede the freeview command with vglrun to get the OpenGL application to run on GPU hardware. In this alias example, the first line of this alias would be revised to:
# User specific aliases and functions
alias fcheck="vglrun freeview -v \ ...
Step 1: Inspect the brainmask.mgz
When inspecting the brainmask, you're checking for:
1) If the pial surface captures regions of leftover dura or skull from the skull-stripping step.
Example: A region of the pial surface boundary (yellow outline) extends to include a portion of the skull near the left parietal lobe.
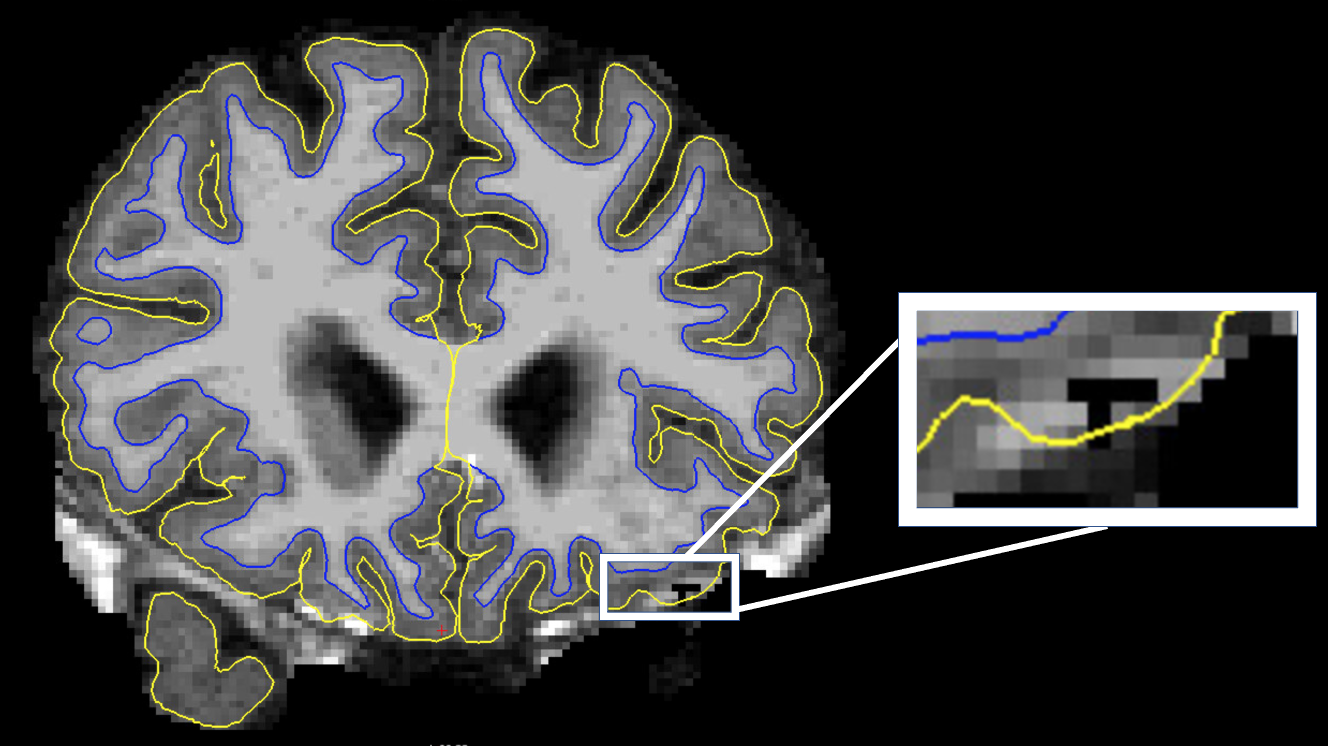 This image was captured by viewing the T1.mgz volume in the coronal view with the bilateral pial and white-matter surface overlays on.
2) If there's portions of the brain that have accidently been removed by the skull-stripping step.
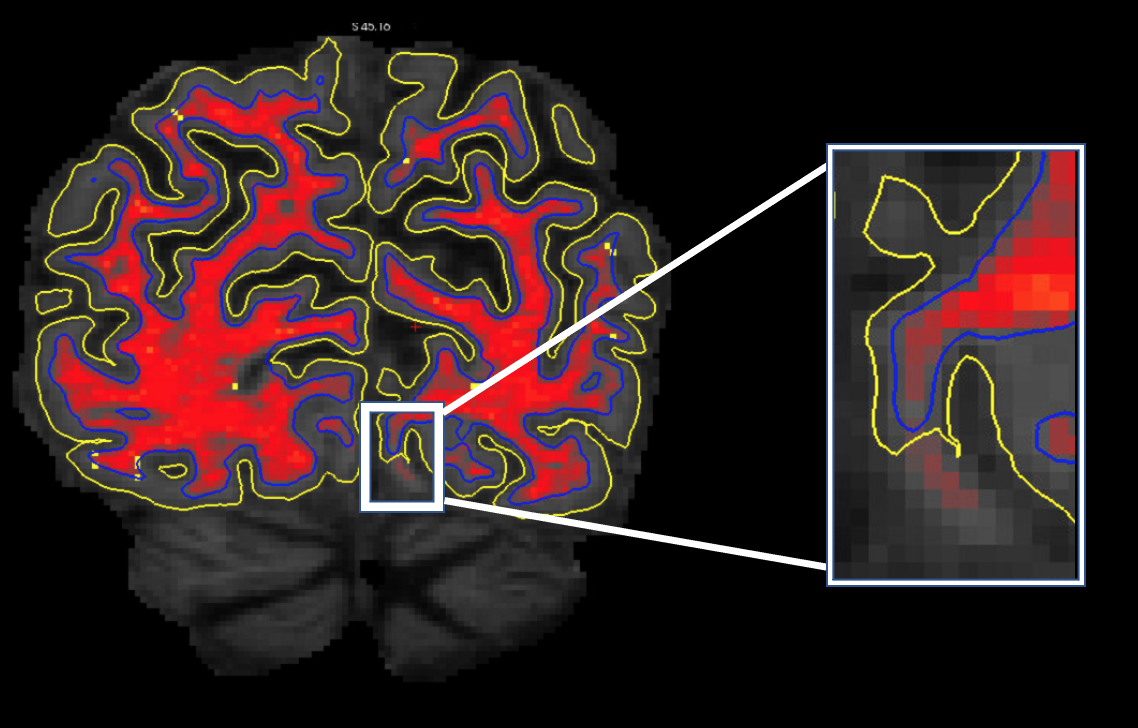
Example: The skull-strip was overly aggressive and removed a portion of the right occipital lobe from the brainmask (the red color-mapped mask).
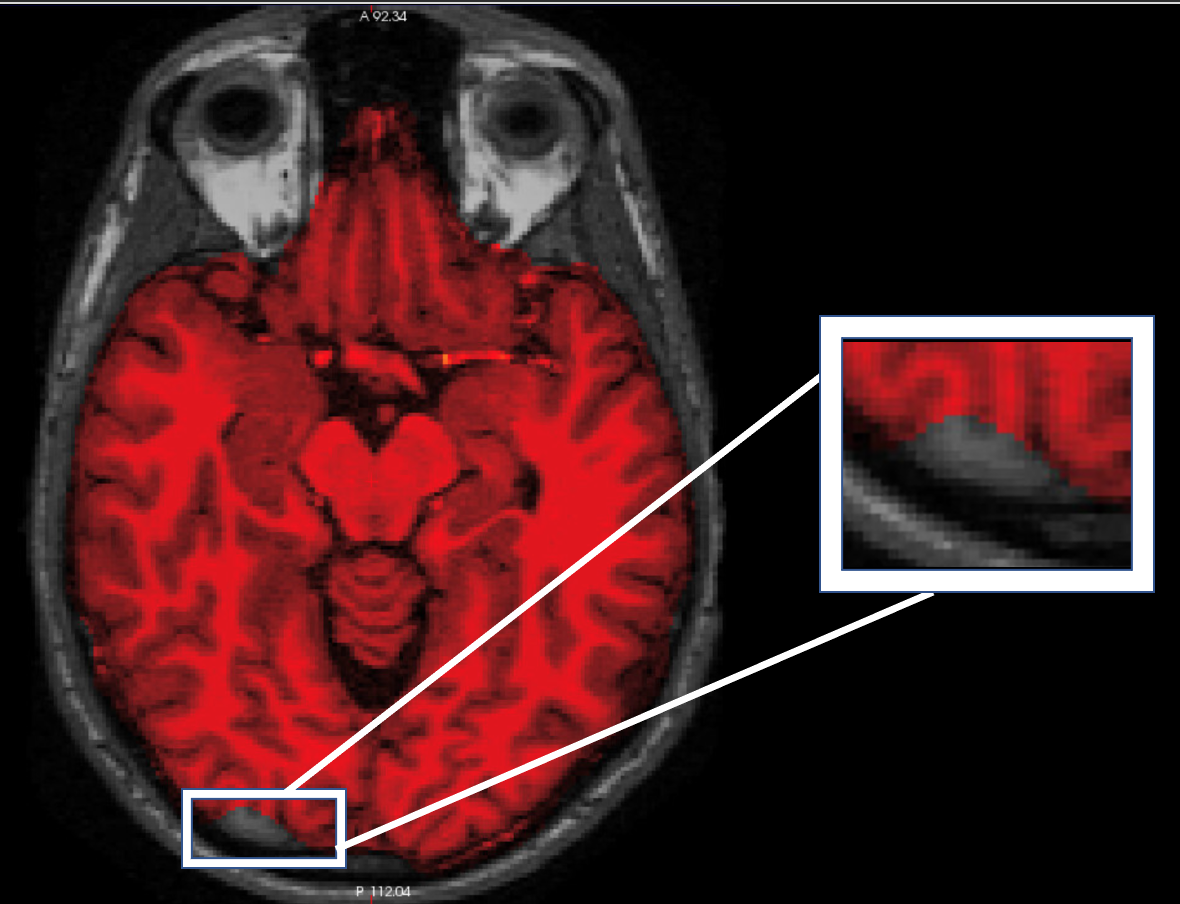 This image was captured by viewing the brainmask.mgz volume set to colormap "heat" ontop of the T1.mgz volume in the axial view. If you are using the above fcheck alias, this is the default colormap set for the brainmask.mgz.
How to fix brainmask errors?
Watershed Preflooding Height
The significance of the brainmask error will determine the best approach to fix it. If the error spreads across mulitple slices or includes very large areas, you will likely want to use an automated method. The first apporach is to adjust the watershed preflooding height (default = 25). If you want to be more conservative (i.e. part of the brain has been removed), you will want to start increasing the watershed to ~ 35. If you want to be more aggressive (i.e. part of the brain has been left behind), you will want to start lowering the watershed to ~ 15. For more on this, see the Freesurfer wiki page on watershed. An example command for generating a new brainmask with a very aggresive watershed paramter (i.e. removing more skull):
[scc4]$ recon-all -skullstrip -wsthresh 5 -clean-bm -no-wsgcaatlas -subjid $SUBJECTS_DIR/$subject
gcut
If after adjusting the watershed preflooding height there's still remnant dura or skull bleeding into the pial surface boundary, you can try using the gcut option. This attempts to to use a graph-cuts approach leveraging white-matter voxel intensity and region growing. For more information see the Freesurfer wiki page on gcut. An example command for running the gcut option:
[scc4]$ recon-all -skullstrip -gcut -clean-bm -no-wsgcaatlas -subjid $SUBJECTS_DIR/$subject
Manually Edit Brainmask
If there are small regions of the skull or dura that are included in the pial surfaces but only across several slices, you can maually remove those voxels from the brainmask. To manually edit the brainmask, select the brainmask.mgz volume in the Volumes window pane on the left of the image below (circled in blue). Then select the Recon Edit button which has a head with an "R" in it and a green pencil (circled in blue). In the resulting pop-up window, make sure the Recon editing box is checked (circled in blue) and select an appropraite brush size, which will correlate to the number of voxels covered by the brush when editing. To remove voxels, Shift+Click and to add voxels Click. When you're done editing the volume, go to File > Save Volume or press Ctrl+S.
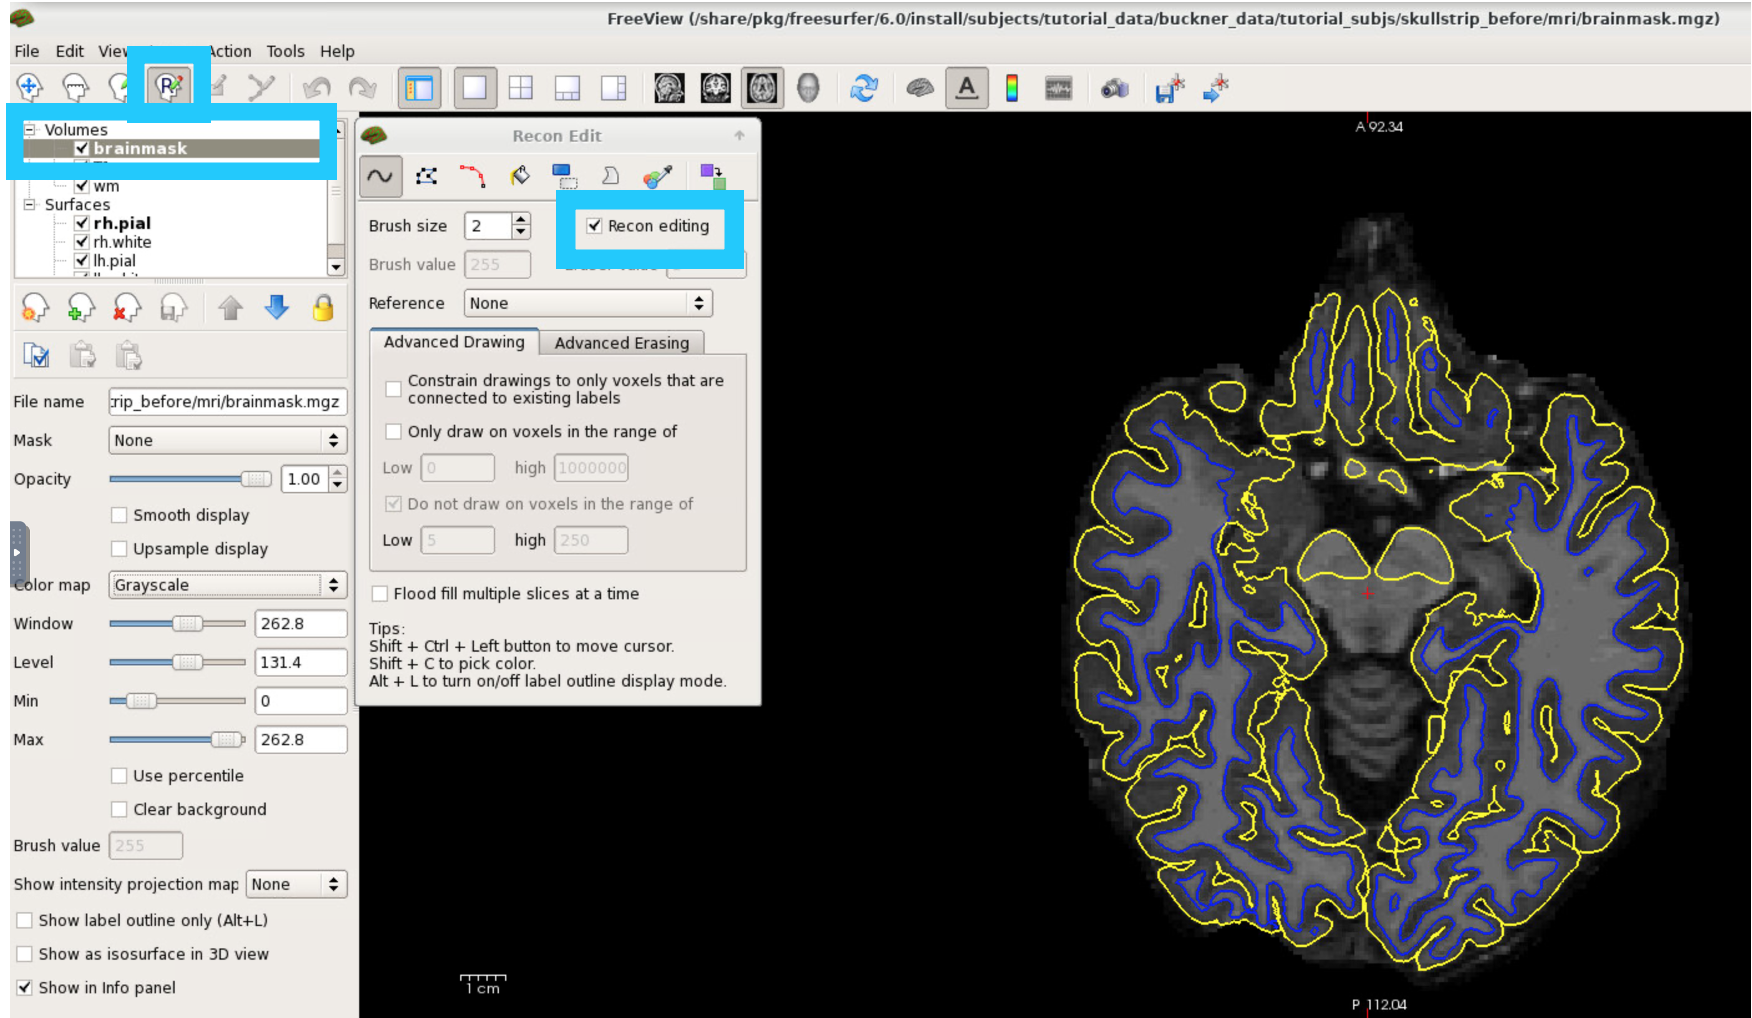 Select the brainmask.mgz, select the Recon Edit button, check Recon editting, set your brush size, then add/remove voxels directorly to your brainmask. When finished, save the brainmask volume.
When to leave brainmask errors?
When starting out using Freesurfer, there is a tendency to perfect every subjects' recon. Not only will this cost you significant time, but incremental changes in very small errors may have no significant effect on the summarized statistics. Generally, you should not be spending more than 30 minutes troubleshooting and correcting a full-brain recon. Additionally, if the brainmask error is only in a handful of voxels across 1-2 slices you can leave the recon as-is.
Resubmission
Once you have corrected the brainmask, you should resubmit the subject for recon-all continuing with the new brainmask. To do so, we use the autorecon2 and autorecon3 flags instead of recon-all. You can replace the last line of the recon-all.qsub file with the following:
recon-all -autorecon2 -autorecon3 -subjid $SUBJECTS_DIR/$subject -parallel -openmp 4
Step 2: Inspect the wm.mgz
When checking the white matter mask, you are looking for voxels that are:
1) NOT white matter (nor ventricles) but are within/below the white matter surface boundary.
Example: Non-white matter (CSF) is being included within the white matter surface (blue outline); where the boundary should instead trace inward around the calcarinus sulcus.
Note: The ventricles are included within the white matter mask, but have a different voxel intensity than white matter. The CSF region below is not part of the ventricles.
 This image was captured by viewing the brainmask.mgz volume in the coronal view with the bilateral pial and white-matter surface overlays on.
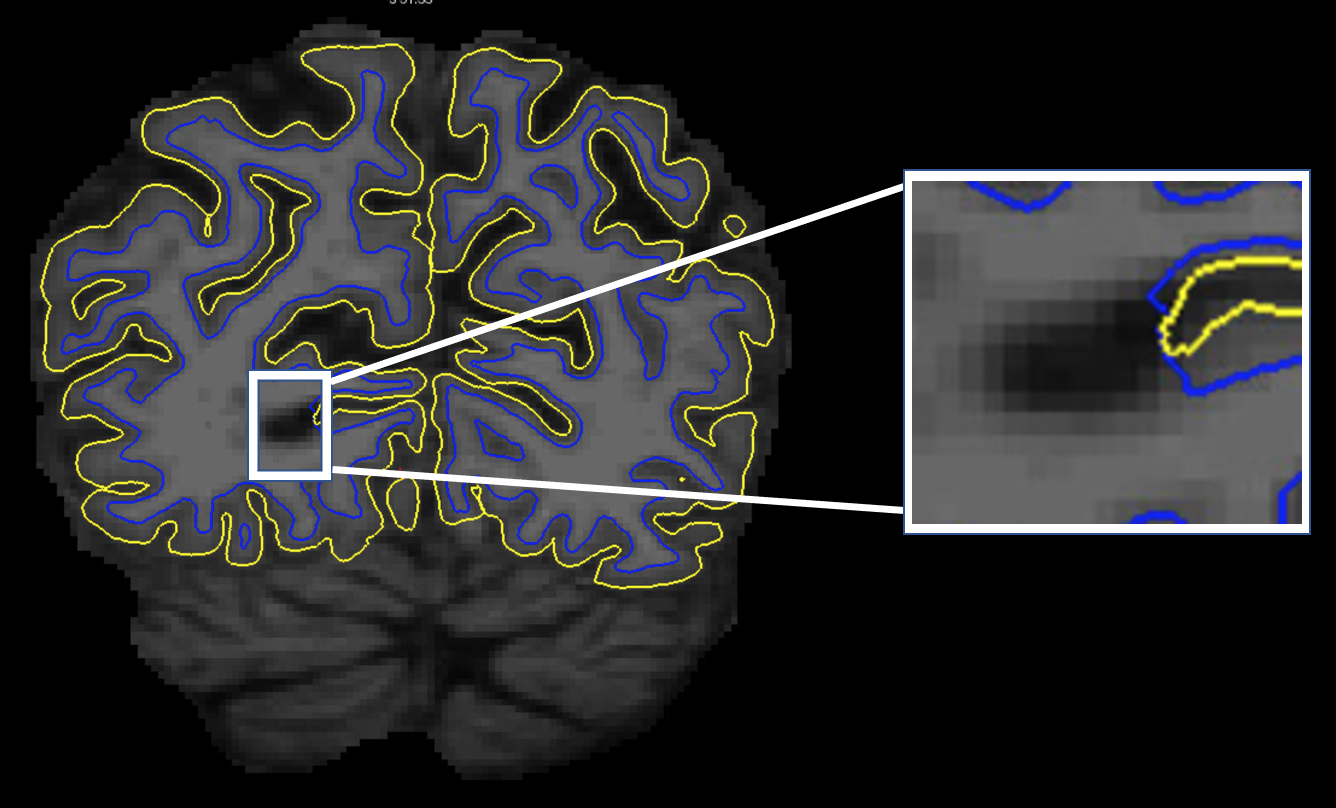
2) DEFINITELY white matter but are outside/above the white matter (and/or pial) surface boundary.
Example: White matter is outside both surface boundaries; but should be included in the white matter (blue outline) surface.
 This image was captured by viewing the wm.mgz volume with colormap set to "heat" ontop of the brainmask.mgz volume in the coronal view with the bilateral pial and white-matter surface overlays on.
How to fix white matter errors?
Control Points
Control points are only used in cases where normal-appearing white matter falls outside/above the white matter surface boundary AND the voxel intensity value of the suspected white matter is < 110. These specific white matter erros occur when non-lesioned white matter are improperly normalized by Freesurfer. There are a couple of general guidelines to follow for using control points since they can drastically change your results on re-run.
- Only add in regions that are definitely white matter (no gray matter/csf partial volume voxels)
- Only add in regions that are below intensity values of 110
- Do not add in brain lesions (instead, use manual edits)
- For 64CH head coils and/or 7T, use 3rd party bias-correction to help normalize prior to running recon-all
- Use sparingly! If you are adding 10s or 100s of control points - you are adding way to many!
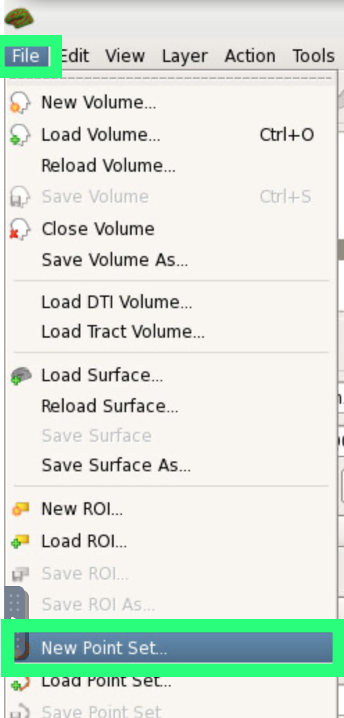
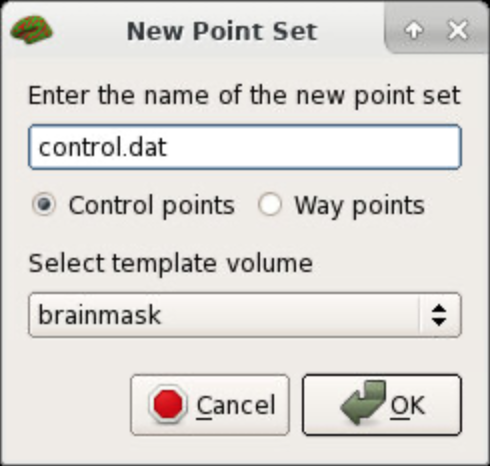
To add control points, click on File > New Point Set as shown in the left image below. A New Point Set window will pop-up, and you will enter control.dat in the blank field as shown in the below in the image on the right. Be sure that Control Points is selected as well in this window and the template volume is the brainmask.
| File > New Point Set | control.dat [brainmask] |
|---|---|
 |
 |
Next, select the brainmask.mgz volume in the Volume window pane and use your mouse and cursor to evaluate the voxel intensity value of the white matter in question. In the bottom left window pane, the voxel intensity values for the static cursor values are displayed and on the bottom right window pane for the mouse. You are interested in the intensity number displayed in the brainmask. See the image below for demonstration.
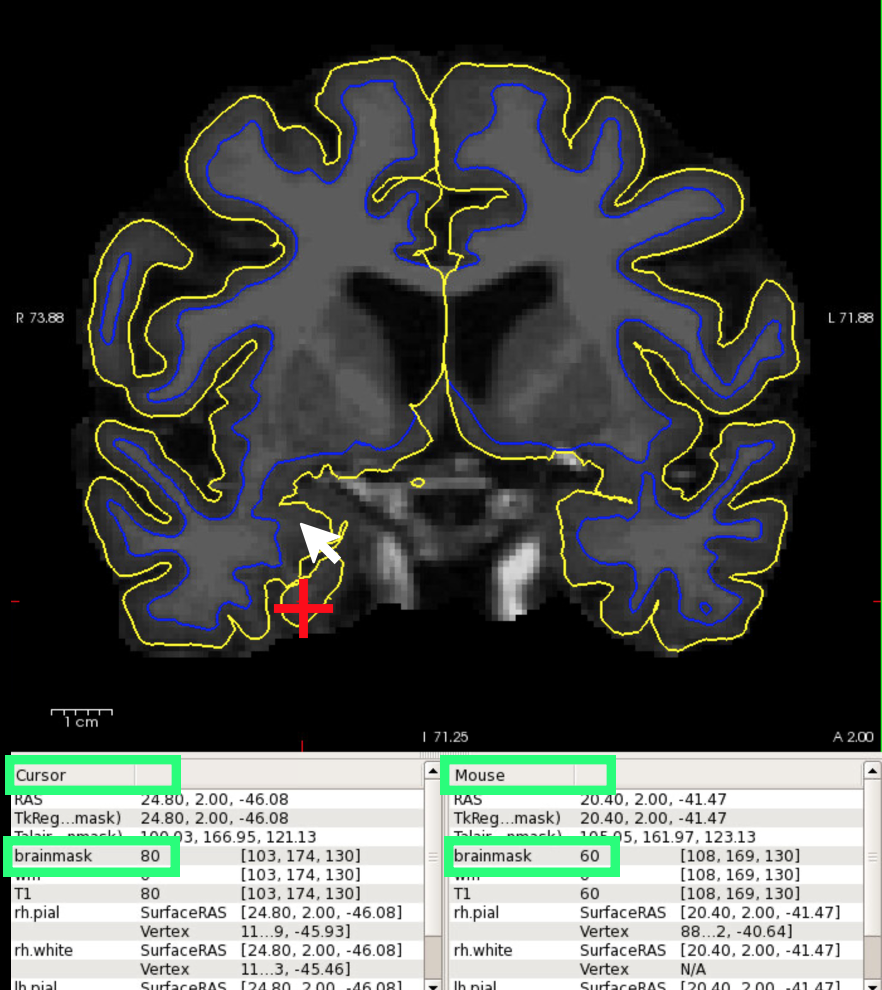
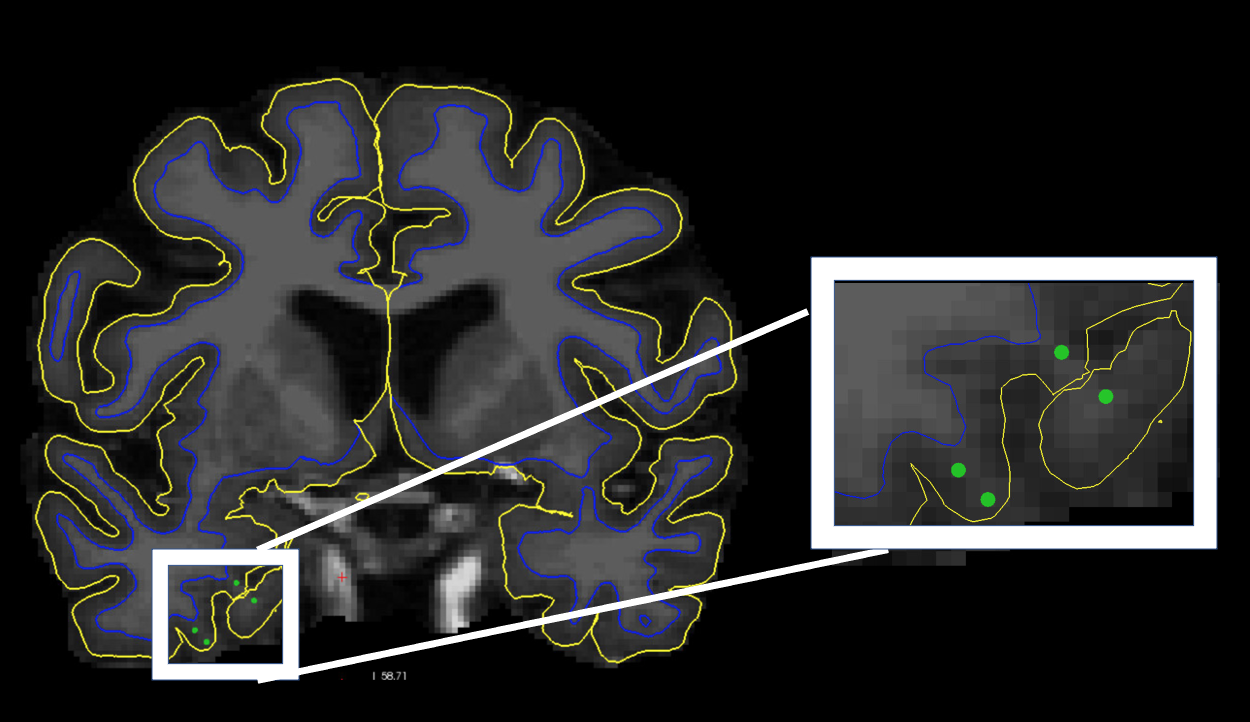
Now you can start adding control points by left-mouse button clicking. Holding down the Shift+Click will delete a control point. As you click to add control points, they will appear as small green dots. Select a few control points around your trouble areas and space them out throughout the brain and on different slices. You want to pick points in a region where the wm intensity is lower than it should be (that is, having a voxel value less than 110). See the example recon with control points below for an example of an appropriate placement per a single slice.
After adding the control points, go to File > Save Point Set or click on the Save point set button. Once you have saved the control.dat file, you should resubmit the subject for recon-all. To do so, we use the autorecon2-cp and autorecon3 flags instead of recon-all. You can replace the last line of the recon-all.qsub file with the following:
recon-all -autorecon2-cp -autorecon3 -subjid $SUBJECTS_DIR/$subject -parallel -openmp 4
Manually Edit White Matter Mask
For all other white matter errors, you will use manual edits. This approach is exactly the same as manually editing the brainmask, except you are directly editing the wm.mgz volume instead. To manually edit the white matter mask, select the wm.mgz volume in the Volumes window pane on the left of the image below (circled in green). You may find it helpful to change the colormap of the wm.mgz volume by clicking the colormap dropdown (circled in green) and selecting "heat". Then select the Recon Edit button which has a head with an "R" in it and a green pencil (circled in green). In the resulting pop-up window, make sure the Recon editing box is checked (circled in green) and select an appropraite brush size, which will correlate to the number of voxels covered by the brush when editing. To remove voxels, Shift+Click and to add voxels Click. When you're done editing the volume, go to File > Save Volume or press Ctrl+S.
In the example below Freesurfer mistakenly labelled a region of CSF as ventricle, therefore adding it to the white matter mask. This labelling error is uniform and only across 4 slices so it's an easy manual correction. The image below demonstrates removal of voxels from a single slice of the wm.mgz.
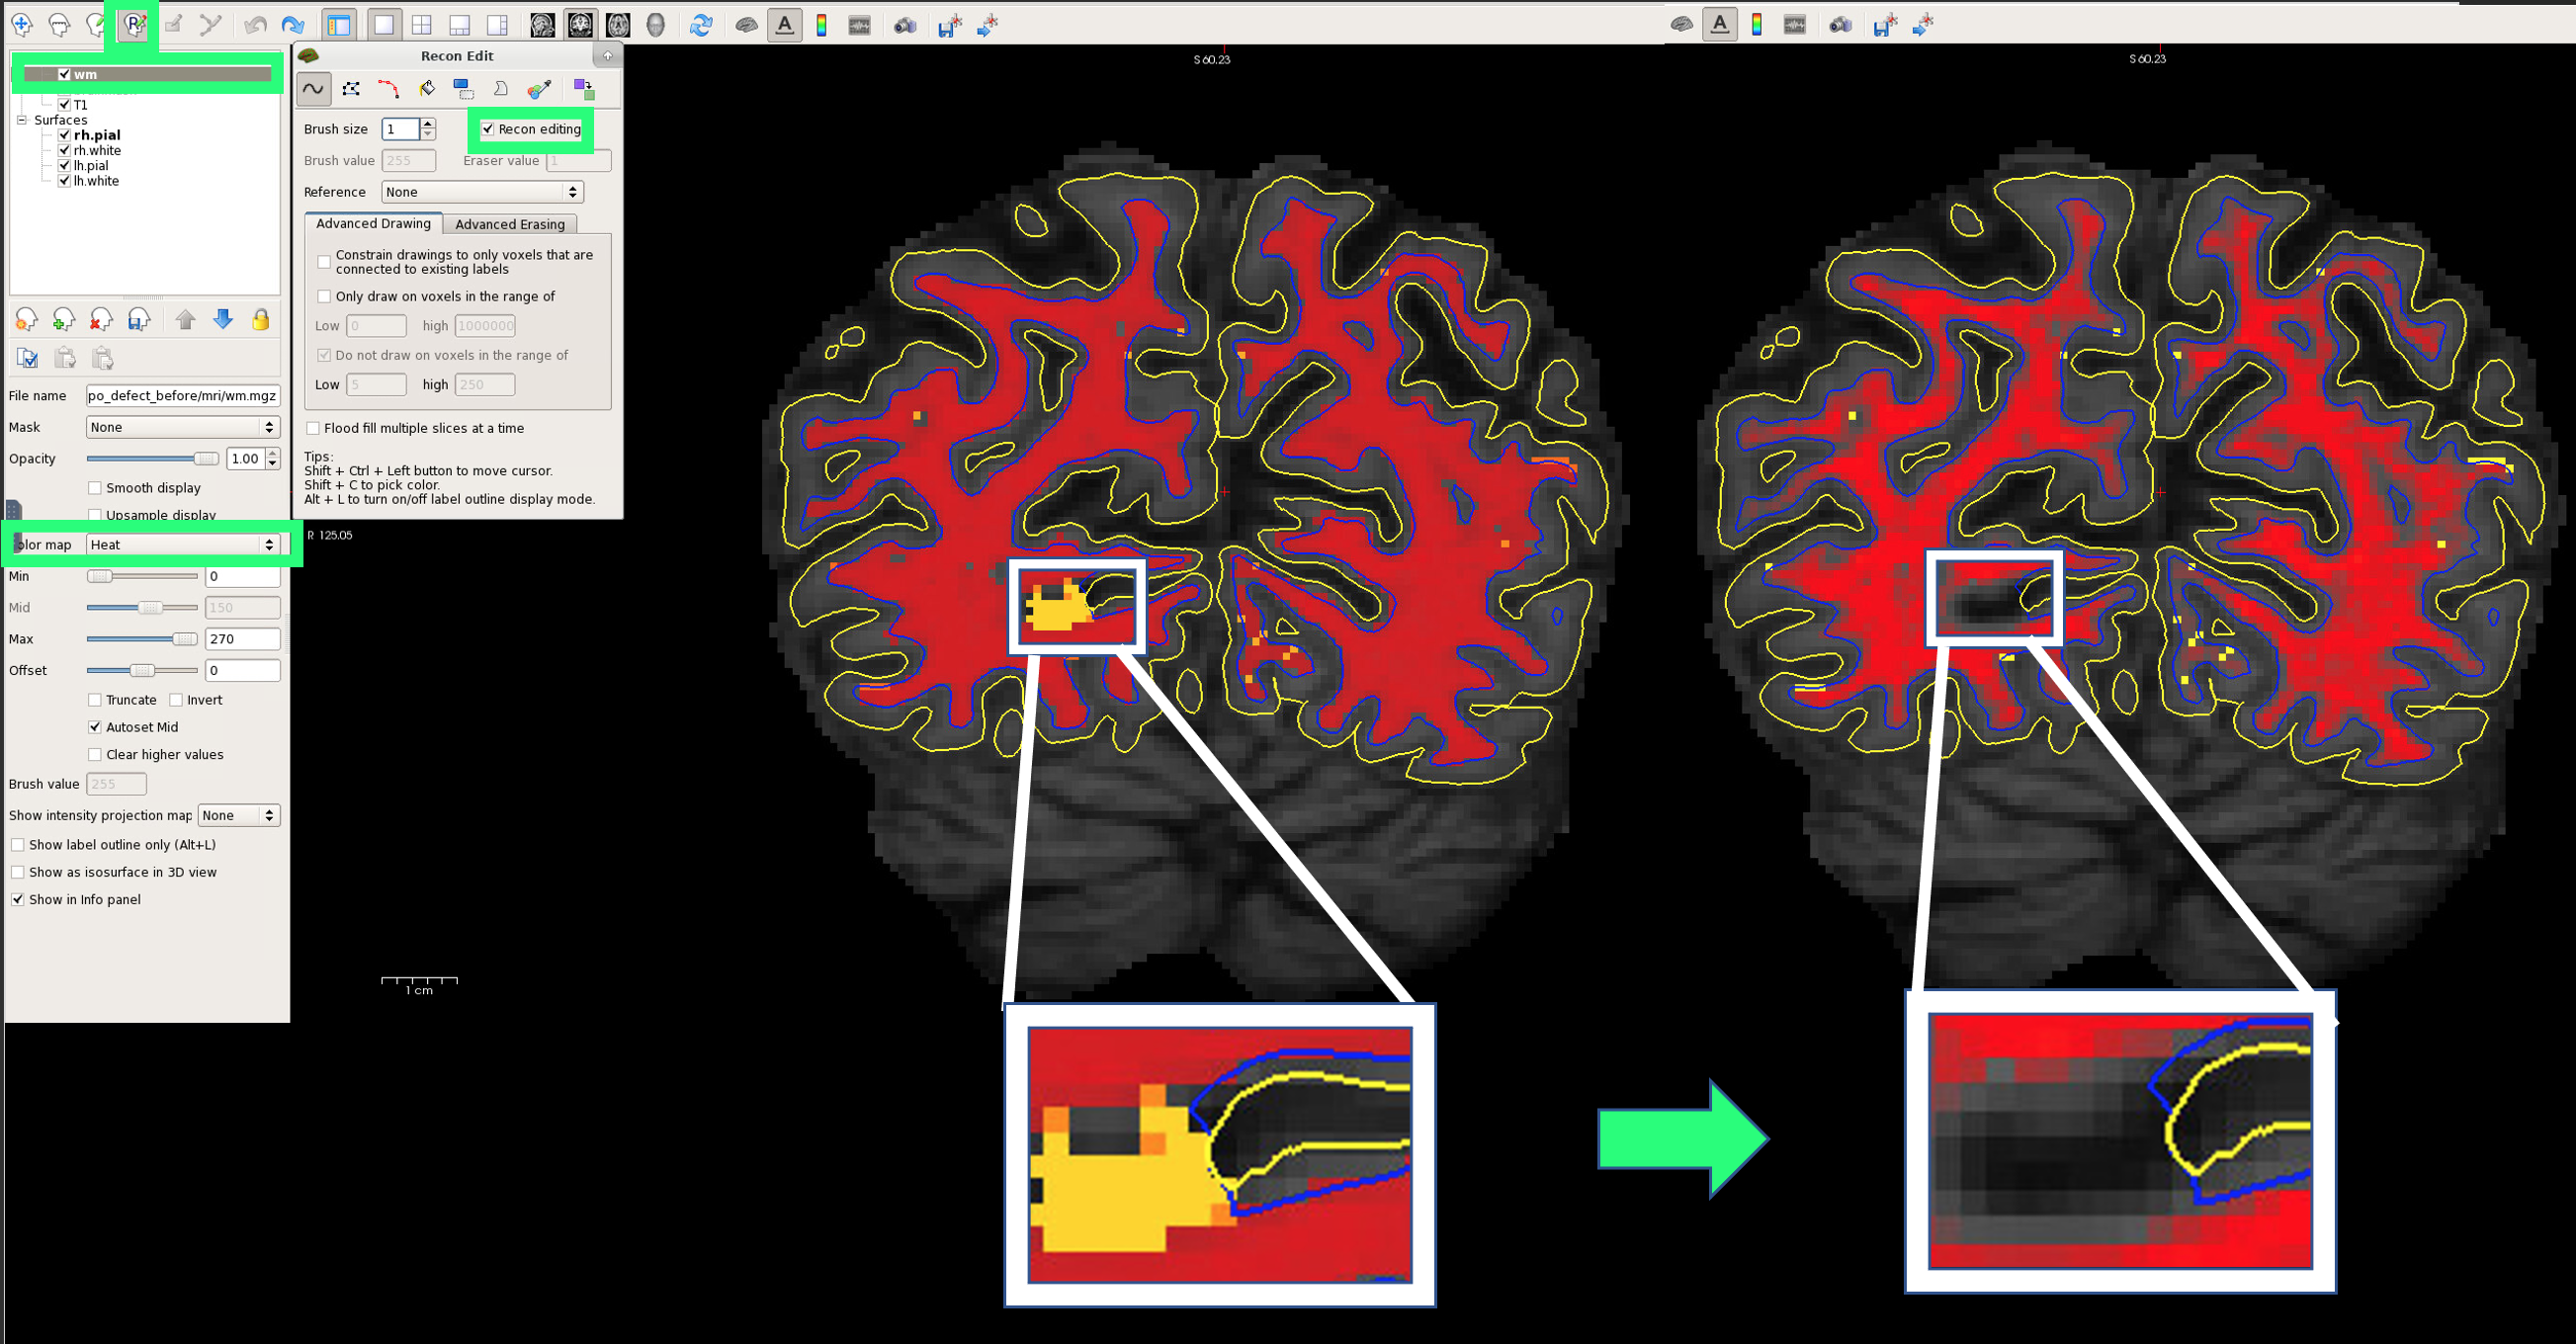 Select the wm.mgz and turn on the heat colormap, select the Recon Edit button, check Recon editting, set your brush size, then add/remove voxels directorly to your white matter mask. When finished, save the white matter mask volume.
After resubmission with the manually corrected white matter mask, the surfaces are corrected as shown below.
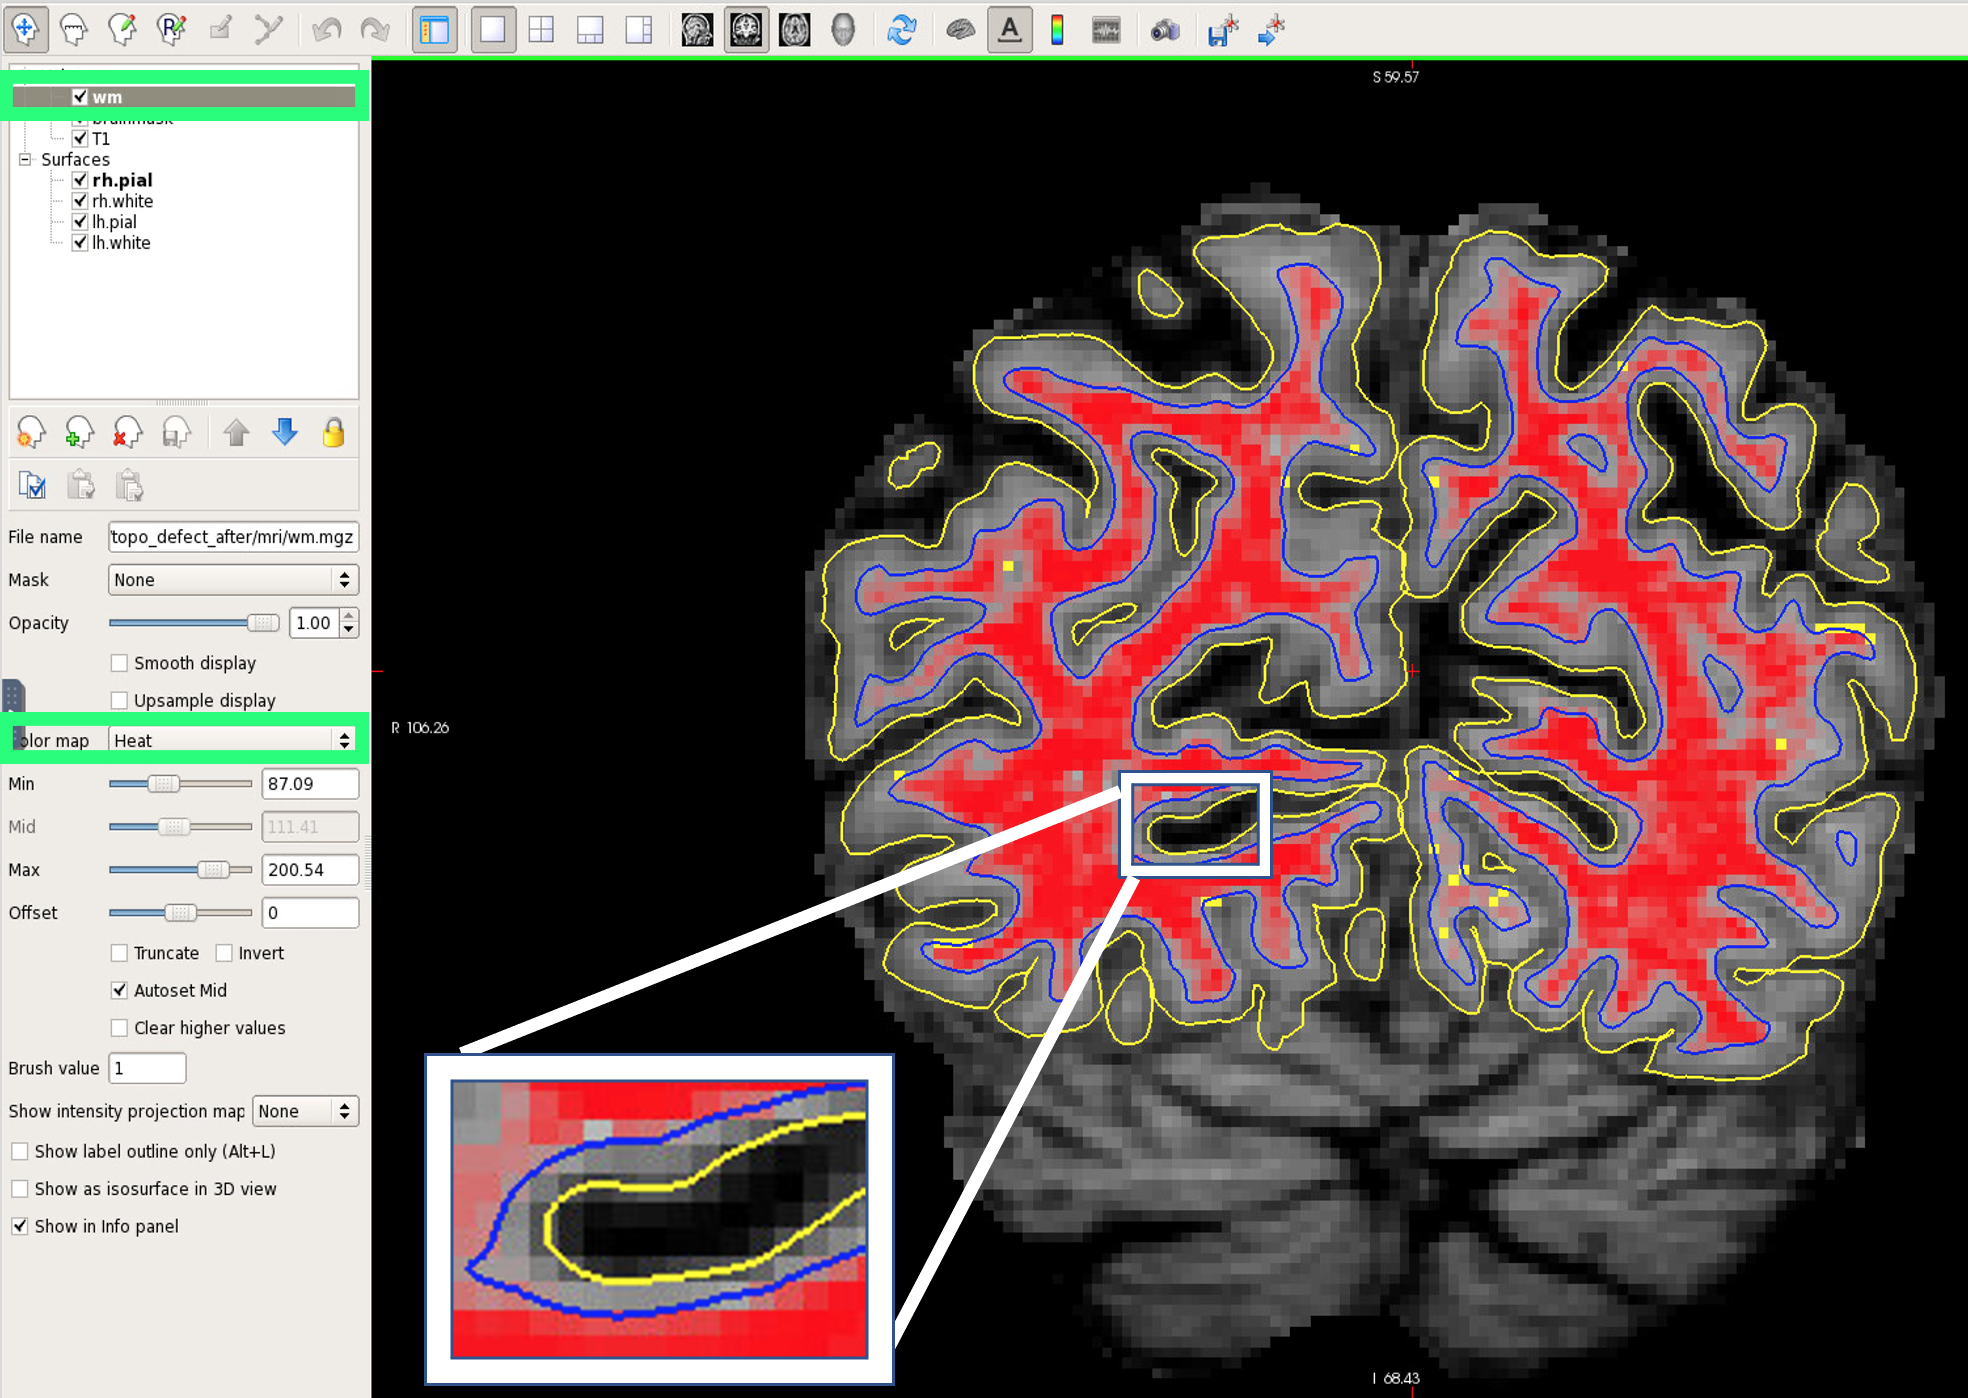 Results of recon-all after wm.mgz correction. See resubmission instructions for white matter edits.
When to leave white matter errors?
When starting out using Freesurfer, there is a tendency to perfect every subjects' recon. Not only will this cost you significant time, but incremental changes in very small errors may have no significant effect on the summarized statistics. Generally, you should not be spending more than 30 minutes troubleshooting and correcting a full-brain recon. Additionally, if the white matter error is only in a handful of voxels across 1-2 slices you can leave the recon as-is.
Resubmission
Once you have corrected the white matter mask, you should resubmit the subject for recon-all. To do so, we use the autorecon2-wm and autorecon3 flags instead of recon-all. You can replace the last line of the recon-all.qsub file with the following:
recon-all -autorecon2-wm -autorecon3 -subjid $SUBJECTS_DIR/$subject -parallel -openmp 4